Water and Sugar
Water
For best results use fresh, clean water. Make sure the water is chlorine-free or your Kefir Grains can be killed. If you live in a city or town with treated water, make sure to pour the water through a filter to remove the chlorine/chloramine.
If you use distilled, reverse osmosis or Zero water add a couple of drops of mineral supplement (available at natural food stores) or a pinch of grey sea salt. You can also use clean, well water if the iron content is not too high. We have found the grains do not do well with some ozonized water. The Real Canadian Spring Water from Superstore and Compliments Spring water from Sobeys both seem to work well. After a bit of experimentation, you’ll discover what works best for you.
We use and recommend the Santevia Water Filtering System. The Santevia removes the chlorine and provides mineral-rich water to grow your grains. No need to boil the water if you have a Santevia.
Sugar
We use organic blonde cane sugar to grow our grains, this results in fast-growing, healthy grains and excellent tasting Water Kefir. Rapadura or sucanat sugar added to the blonde cane sugar is an excellent addition. The grains love the molasses in the rapadura and sucanat sugars. Coconut sugar is another excellent choice. Do Not use bleached white table sugar or honey.
Equipment
Use clean, dedicated equipment, this helps avoid contamination and bad taste. Plastic and glass are preferred. Equipment cleaned in the dishwasher works just fine. No Metal.
You’ll need:
2–Plastic funnels 15cm (6”) and 10cm (4”)
2–Measuring cups–1 & 4 cup plastic or glass
1–Large wood or plastic spoon
2–Large glass bowls
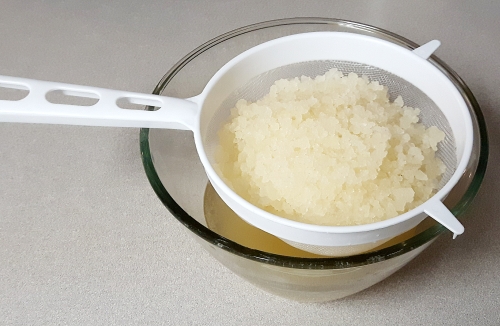
1–Fine mesh plastic strainer–I use an 18cm (7”) strainer–smaller strainers are handy for when your
grains first arrive.
1–Tablespoon (plastic)
1–500ml (1 pint) Glass jar to get started. Other sizes as required as you increase production.
–Bottles and/or jars with tight sealing lid as required. Bottles can be clear or brown.
–Jars for storing extra grains.
–Cloth and rubber bands for lids–I use mesh or muslin cloth. This lets the cultures breathe and keeps
everything else out.
–“Stick on” aquarium thermometer or digital temperature gun to monitor the temperature.
A heating mat is helpful during cold months. Ideal temperature for your grains is 24-26C
You’ll likely modify the list as you go but this will get you off to a good start.
When Your Water Kefir Grains Arrive
Your grains have made the stressful journey from our facility to your home and now it’s time to re-balance and rejuvenate the cultures. You’ll accomplish this by completing two water/sugar cycles before starting fermentation. If you ordered live grains please proceed to “OK, Let’s Get Started”.
Note: If your grains arrive frozen, let them thaw completely before proceeding.
If you Ordered Dehydrated Grains
Here is the rehydration process for Dehydrated Water Kefir Grains.
- Mix ½ tablespoon of sugar in 1 cup of non-chlorinated, room temperature water. Add your dehydrated Kefir Grains.
- Let sit for 24 hours.
- After 24 hours, pour the mixture through a plastic strainer and discard the water.
- Repeat steps 1-3 one more time using 2 cups of water and 2 tablespoons of sugar.
- Continue at “OK Let’s Get Started” .
OK, Let’s Get Started
In a clean, glass jar dissolve 1 tablespoon of sugar in 1 cup of water 24-26°C (75-80°F) then add your Kefir Grains. Cover the jar with a clean, breathable cloth and hold the cloth in place with a rubber band. Let this ferment in a warm spot 22-26°C (72-80°F) for 48 hours. The Kefir Grains need sugar to survive and will starve if left too long.
On top of your fridge is usually a good spot to ferment the grains. Another great spot, especially during winter, is in the oven with the light on, make sure to monitor the temperature and keep it under 26C (80F). If fermentation conditions are too cold your grains will grow slowly or not at all.
After the First 48 Hours
Drain the mixture into a plastic strainer and discard the sugar/water mixture. Repeat the process one more time before moving on. After the second 48 hours, you are ready to proceed with Fermentation Stage 1, this is where the fun starts!
Basic Water Kefir Recipe – Using Two-Stage Fermentation
1 – Tablespoon of Water Kefir Grains
1 – Tablespoon of organic sugar + a pinch of rapadura or sucanat sugar
1 – Cup of water 24-26°C (75-80°F) For Fermentation Stage 1 you can use any multiple of this
formula depending on the quantity of Kefir Grains.
Example: 6 tablespoons of Kefir Grains, 6 cups of water and 6 tablespoons of organic cane sugar + 1 tablespoon of rapadura or sucanat sugar
Fermentation Stage 1
- Combine the sugar and water and stir until the sugar is fully dissolved, add the Water Kefir Grains. Cover with a cloth lid and let sit in a warm place 24-26°C (75-80°F) for 48 hours.
- After 48 hours pour the mixture through a strainer and set the grains aside for your next batch.
- Taste the mixture using a straw. (I just dip the straw in about ½ way and place my thumb over the end and then pull it out). The mixture will taste less sweet than when you started. If you want your Water Kefir a little on the sweet side, you can proceed to Stage 2 and bottle your Kefir. If you want it less sweet, then cover and let it sit an additional 24 hours before proceeding to Stage 2.
Fermentation Stage 2
Pour the liquid in bottles along with fruit juice. My favorites are Orange, Pomegranate, Cranberry, Cherry, Peach and Mango. Ideally, the juice is organic. I use Santa Cruz, Happy Planet and Lakewood and they all work great. You can also use freshly made juice. Start with 1 ounce of juice to 1 cup of Water Kefir and then adjust to your taste. Try experimenting with different juices and unsulfured dried fruits. Some folks enjoy Water Kefir without any additional juice or other flavours, this is where you can experiment. Seal the bottles with tight-fitting lids and let sit in a warm place for 48 hours.
Test after 48 hours by slowly cracking the lid on the bottle. Be careful here. The contents are most likely under pressure and can make quite a mess if you open the bottle too quickly. If your Water Kefir is ready it will fizz up, you can now place the bottles in the refrigerator, and this will stop the fermentation process. If the Kefir has little or no fizz, add ½ teaspoon of sugar or if you have room in the bottle add more juice and then wait another 24 hours. Note: If you don’t want the fizz (carbonation) refrigerate your Kefir as soon as you bottle it.
Now that you’ve completed your first batch of Water Kefir it’s time to start the process all over again using the basic recipe above. Feel free to get creative by adding a bit of dried fruit, ginger, root beer concentrate or vanilla.
If Your Grains seem to be a bit sluggish and are not growing it is usually one these three
Water – Try using one of the Spring Water brands mentioned above.
Temperature – Stick an aquarium thermometer to your fermentation jar and keep at 24 – 26 C. You can use a heating mat to maintain ideal temperature.
Mineral content – Try adding a couple of drops of mineral supplement, add a pinch of grey sea salt or an extra teaspoon of Sucanat sugar.
Thank You! We wish you much success!
Have a question? Please give us a shout at support@water-kefir.ca we’d love to hear from you!
Hi there – I’m heading on vacation for a week. I’d like to store my water kefir grains in the fridge and reuse them when I get back. I’ve read conflicting reports on how to store them for the week, and what to do when I’m back. Can you please tell me:
1. what steps do I need to take to store the water kefir grains for a week in the fridge; and
2. what steps do I need to take to start brewing again?
Thanks in advance for your help. My wife ordered these for me at Christmas from you guys, and I LOVE them!
Hello Norm,
Thank you for your question.
1- To park your grains. Put your grains in a glass jar and completely cover with slightly sweet water (1 tsp sugar in 1 liter of water) cover the jar with a sealed lid. Refresh the water/sugar mix every week.
2- When you’re ready to get started again. Bring the grains to room temperature, put the grains in sugar/water using half the amount of sugar for two cycles. After two cycles resume brewing using the full amount of sugar.
Happy to help with any other questions.
All the Best,
Shannon
GoGo Kefir
Hi,
Can I filter my water with Brita filter then add a pinch of Himalayan salt instead of sea salt?
Hello Janice
Thank you for your question.
Yes, Himalayan salt is a great source of minerals.
All the Best,
Shannon
Hi
I don’t eat sugar and wonder if I can use stevia instead?
Thank you
Hello Judy,
Thank you for your question.
The grains will not survive with Stevia.
The bacteria consume the carbs in the sugar. So little or no sugar will remain after fermentation. If the kefir still tastes
sweet after 2 days let it sit another day until it’s a little more bitter.
All the best,
Shannon
Hi. I just ordered dehydrated grains. My question is, once you have them to may a batch of sofa do you re use them or do you have to buy them over and over for revert batch? How long do they last and do you just re use them?
Hello Heidi,
Thank you for your question.
After the first fermentation you pour the contents (including the grains) through a plastic strainer and reuse the grains for your next batch. The grains can be used again and again and will continue to multiply over time as long as they are well cared for.
Please let me know how you make out, we’re always here to help.
All the best,
Shannon
GoGo Kefir
Hi
I want to make coconut kefir
Plz guide me if I buy that whole 59 dollar pack ,step wise I was reading but Em confused can u plz guide me in simple words.
Regard
Maria
Hi Maria,
Thank you for your question.
Before making coconut water your kefir grains should be working for 3 weeks following the Water Kefir brewing instructions.
Basic Coconut Water Kefir Recipe:
1/2 cup water kefir grains
3 cups of coconut water
Pour room temperature coconut water into a 1L jar.
Add the water kefir grains, cover loosely and let sit in a warm spot (24-26C)for 48 hours (no longer)
After 48 hours, Use a plastic, fine mesh strainer to separate the grains from the liquid and put the liquid into a bottle with a tight fitting lid.
Add fresh fruit or juice to the liquid. Let sit for 12-48 hours. Enjoy!
Important! When making coconut water kefir you’ll need to put the grains in a basic sugar/water solution f0r 48 hours every 2-3 batches of coconut water to keep them healthy.
Hope this helps, please let me know.
All the best,
Shannon
Thanx u mean that I need to put grains in sugar water for three weeks then go for coconut water kefir
(Before making coconut water your kefir grains should be working for 3 weeks following the Water Kefir brewing instructions)
Hi Maria,
Yes, that is correct. Please let us know how it works out for you.
All the best,
Shannon
Hi
Can I delay using the kefir grains for 2 weeks or more upon receipt of shipment?
Thanks
Carol
Hello Carol,
Thank you for your question.
Just to confirm which grains did you order the Dehydrated or live Water kefir grains or Milk Kefir grains.
All the Best,
Shannon
GoGo Kefir
I am wanting to purchase and get some water kefir grains going. Did milk ones for a year or so. They would just go all thick and I would make kefir cheese so what I do with water kefir grains ?
We go away on weekends . Leave Friday night home Sunday late?
Hi Tracey,
Thank you for your purchase! We do pretty much the same thing. So if you refresh your grains on Friday before you leave and then refresh them again Monday morning when you return they’ll be just fine. After that, resume the regular feeding schedule.
All the best,
Shannon
This is my second time purchasing the water kefir.
the first batch I used organic cane sugar and it worked great. if I were to use just sucanat sugar, would the kefir like that?
Hi Colin,
Thank you for your purchase! We recommend using only a pinch of sucanat when you start the batch, as they grow you can add a bit more but the majority of sugar should be organic cane sugar as before. Too much sucanat will throw the grains out of balance.
All the best,
Shannon
GoGo Kefir
Can a person use alkaline water to make it?
Hello Gwendolyn, Thank you for your inquiry.
Yes, you can use alkaline water, we use the Santevia water which is about 8.0 ph. A few customers have mentioned that the ” Flow Alkaline Spring Water” does not work with the grains, so I would avoid that one.
All the best,
Shannon
GoGo Kefir
Hello,
my question relates to water that can be used. I use a Berkey water filter (black filters and white flouride filters).
Would you know if that water will work as is?
Hello and thank you for your inquiry.
The Berkey Water should work great and produce excellent Water Kefir.
All the best,
Shannon
GoGo Kefir
I will be making Coconut Kefir from the water grains. Do you have a recipe? I will be using guar gum to thicken.
Hi Elaine,
Thank you for your question
Before you make your coconut water your grains should be working for at least 3 weeks and then put into sugar/water every 2 to 3 batches in order to keep them healthy.
Coconut Water Kefir:
1/2 cup water kefir grains
3 cups coconut water
Pour the room temperature coconut water into the 1 L jar.
Put the water kefir grains into the jar
Cover loosely and let it sit for 48 hours (not longer).
Using a plastic, fine mesh strainer, separate the grains from the liquid and pour the liquid into a bottle with a lid that seals tight.
Repeat the process.
Do a second ferment with fresh fruit or juice.
Sit for 12 to 48 hours
I’m not sure if you’ll need the Guar gum which is used mostly in Coconut milk kefir.
All the Best,
Shannon
GoGo Kefir
Hi,
I am new to water kefir and I’m hoping it helps with arthritis as I’ve heard. I was given a jar full of water kefir grains by a friend, two weeks ago. One website recommended storing extra grains in sugar water, in the fridge, so after removing an appropriate amount for immediate use, that’s what I did.
From the information on your website, I have not treated them very well. Although there may be many roads to success, after two weeks of brewing experience, your advice seems to be the better choice.
1) are my extra grains still safe to use?
2) assuming they are still viable (and how will I know) what should I do to bring them back into rotation?
3) is light level important, as with kombucha?
FYI….I made a delicious batch, doing a second ferment, using 4 cups water kefir, 1/4 tsp. vanilla and 1 cup fresh raspberries.
After 24 hours I sealed the jar and refrigerated, with the fruit to get all the flavour, then removed the fruit a day later and bottled. It is super delicious.
Hello Nadine,
Thank you for your question and welcome to the wonderful world of water kefir.
Because your grains were stored in the fridge they may need a little “wake up”. Start by placing the grains in a sugar water mix (according to the ratios in our instructions) for two cycles. You can now put these grains into your normal rotation.
You will know your grains are viable by trying a second fermentation. If your kefir develops fizz (carbonation) then the grains are working just fine.
For long term storage we recommend dehydrating the grains . You can use a dehydrator if you have one, set to the lowest setting for 24 hours. Otherwise just let them sit on a cookie sheet lined with wax paper. Dry for 3 or 4 days and then place them in a zip lock or food saver bags and throw them in the freezer. They’ll keep for 6 months or longer in the freezer.
If you choose to store live grains, in the fridge or not, you should change the sugar water mixture every 3 or 4 days.
Light is not a big factor with water kefir, much more important with kombucha.
I am definitely trying your raspberry/vanilla recipe. Sounds delicious!
All the best,
Shannon
Does water kefir and Kombucha taste similar? I’m not sure which one I would like better
Hi Lynn
Great question, I drink both and find the Water Kefir a little milder than Kombucha. The Kombucha is slightly tart while the Water Kefir is generally sweeter, both can be flavored pretty much any way you like. My suggestion is to start with water kefir and you can try kombucha at a later time. You can also find kombucha at most stores, so maybe try a few flavors and see how you like it.
I find the difference between the two is that kombucha has a fuller bodied, slightly vinegary taste, which many people like, some don’t. Water kefir tastes more like a soda. Water kefir is a bit easier to make, with a much faster turnaround time than kombucha.